Share this

A simple intelligent robot designed based on the AT89C51 microcontroller.

2026-04-06 08:48:40 · · #1
Introduction With the continuous development of microelectronics technology, the integration level of microprocessor chips is becoming increasingly higher. A single microcontroller can now integrate a CPU, memory, timer/counter, parallel and serial interfaces, watchdog timer, preamplifier, A/D converter, D/A converter, and other circuits on a single chip. This makes it easy to combine computer technology with measurement and control technology to form an intelligent measurement and control system. This technology has also spurred rapid development in robotics. Currently, it is entirely possible to design and manufacture simple intelligent robots with certain special functions. 1 Design Concept and Overall Scheme 1.1 Design Concept of a Simple Intelligent Robot This robot can walk along a guide line in any area, automatically avoid obstacles, and walk along a light source when guided by a light source. Simultaneously, it can detect metal pieces buried underground, emit audible and visual indications, and store and display the number of detected breakpoints and the distance from each breakpoint to the starting line in real time. Finally, it can stop at a designated location and display the time of the entire operation. 1.2 Overall Design Scheme and Block Diagram This design uses the AT89C5L microcontroller as the core for detection and control. Infrared photoelectric sensors are used to detect black lines and obstacles on the road surface, metal sensors are used to detect metal pieces under the road surface, photoelectric encoders are used for distance measurement, photoresistors are used to detect and determine the location of the garage, and PWM (pulse width modulation) technology is used to dynamically control the rotation direction and speed of the motor. Software programming is used to achieve precise control of the robot's movement, obstacle avoidance, and stopping, as well as the storage and display of detection data. Through optimized circuit combination, the full resources of the 51 microcontroller can be utilized to the maximum extent. Port P0 is used for digital tube display, port P1 is used for PWM drive control of the motor, and ports P2 and P3 are used for sensor data acquisition and interrupt control. The advantage of this approach is that it fully utilizes the internal resources of the microcontroller and reduces the overall design cost. The overall scheme is shown in Figure 1. 2 System Hardware Composition and Design Principles The hardware of this system consists of a microcontroller unit, sensor unit, power supply unit, audible and visual alarm unit, keyboard input unit, motor control unit, and display unit, as shown in Figure 2. 2.1 Microcontroller Unit This system uses the AT89C51 microcontroller as the central processing unit. Its main task is to scan the keyboard input signal to start the robot, continuously read the data collected by the sensors during the robot's movement, process the data, and generate PWM pulses with different duty cycles according to different situations to control the motors. Simultaneously, it sends relevant data to the display unit for dynamic display and generates audible and visual alarm signals. Specifically, P0 is used for dynamic display on the digital tube, P1.0-P1.5 control two motors, P1.6 and P1.7 are independent keyboard interfaces, P2 connects to the sensor, P3.2 connects to the photoelectric encoder for mileage counting, P3.7 connects to the audible and visual alarm unit, and P3.4, P3.5, and P3.6 connect to LEDs for displaying the number of breakpoints. 2.2 Motor Control Unit This robot uses a dual-motor, dual-wheel drive vehicle as its base. The two motors independently control the left and right wheels, achieving turning by the different speeds of the two motors. It can also turn on the spot, making it easy to control. Traditional vehicles, driven by a power motor and a steering motor, are difficult to control in terms of turning angle and are inconvenient to use. The motor control circuit uses an H-type drive circuit composed of high-power transistors BDL39 and BDL40. A microcontroller generates PWM pulses with different duty cycles to precisely adjust the motor speed. This circuit, operating in transistor saturation or cutoff states, avoids transistor power consumption during linear amplification, maximizing efficiency. The H-type circuit ensures simple control of motor speed and direction. The speed and stability of the electronic switches fully meet requirements. This entire drive circuit represents a widely adopted motor drive technology. The circuit diagram is shown in Figure 3. 2.3 Sensor Unit The robot uses nine sensors distributed across different parts of the robot, working together to perform different functions, as shown in Figure 4. The sensors in Figure 4 are described as follows: Sensor 1 is a downward-facing metal detection sensor located directly in front of the robot, used for detecting metal. Sensor 2 is a forward-facing ultrasonic sensor located directly in front of the robot, used for detecting obstacles. The ultrasonic waves originate from a 40 kHz square wave signal generated by a 555 timer and emitted through an ultrasonic transmitter. The transmitter continuously emits signals. When it encounters an obstacle, the signal is reflected back, and the receiver receives the signal, sending it to the microcontroller for appropriate judgment and processing. Sensor 3 is an infrared photoelectric sensor positioned directly in front of the robot, pointing downwards, used to detect stop lines. The infrared transmitter emits a signal, which is reflected by different reflective media. The receiver makes a judgment based on whether the signal is received. Sensors 4 and 5 are infrared photoelectric sensors positioned below the robot's base, pointing downwards, used to detect guide lines on the ground, operating on the same principle as sensor 3. Sensors 6 and 7 are photoresistive sensors positioned directly in front of the robot, pointing forwards, used to locate light sources. When a light source shines in front of the robot, the photoresistance changes. The changes from the two sensors are compared and processed before being sent to the microcontroller, which generates a corresponding adjustment signal to guide the robot towards the direction of the light intensity. Sensor 8 is an ultrasonic sensor positioned on both sides of the robot's rear, pointing outwards, used for turning when the robot encounters obstacles, determining whether the robot has completely avoided the obstacle, operating on the same principle as sensor 2. Sensor 9, located at the rear of the robot, is an optical encoder for mileage measurement. Utilizing a mouse-like principle, a self-made optical encoder is constructed using a 2.6 cm diameter plastic wheel. After polishing to a circumference of 8 cm, eight equally spaced holes are drilled into the wheel, as shown in Figure 5. The minimum distance measurement accuracy reaches 1 cm, sufficient for the requirements. Optical sensors are mounted on both sides and installed at the rear of the robot to synchronize with its movement. While the distances between the self-made holes cannot be precisely equal in practice, measurements show that the optical encoder generates 50 pulses for every 50 cm traveled; therefore, this is used as the reference unit for distance calculation. In the straightaway section, the distance between the center line of the track and the starting line can be calculated from the number of pulses generated by this circuit. Furthermore, to clearly and intuitively observe the working status of each sensor, a working indicator light is specifically designed for each sensor, displaying its real-time operating status. 2.4 Keyboard Input Unit The keyboard input unit uses an independent keyboard consisting of two keys: a start key and a display switch key. Pressing this key after the robot has completed its journey will display the total time taken. 2.5 Display Unit The display unit consists of two 7-segment LED displays. To reduce overall system power consumption, a microcontroller-based software decoder dynamically displays the distance from each breakpoint to the starting point and the total time taken for the entire journey. 2.6 Audible and Visual Alarm Unit A 555 timer is used as the oscillator. A microcontroller triggers the oscillator to drive an electromagnetic buzzer as the sound indicator and a single LED as the light indicator, thus forming the audible and visual alarm unit. 2.7 Power Supply Unit This system uses two power supplies to separately power the motor and control circuit. The system control circuit uses a 5V output regulated by a 7805 timer, while the motor is powered by four AA batteries. 3 System Software Design The system's software program adopts a modular structure and is written in C language. The system mainly consists of modules such as initialization program, deviation adjustment program, deviation from light source adjustment program, audio-visual indication subroutine, sensor status reading program, display program, interrupt service routine for Timer 0, interrupt service routine for Timer 1, service routine for external interrupt 0, and parking handling. The main flow of the system is shown in Figure 6. 4. Conclusion This robot has achieved the expected results after multiple experiments on a pre-defined track, but its level of intelligence is still far from sufficient. With the continuous research and deepening of artificial intelligence and neural network technologies, the development prospects of intelligent robots will become increasingly broad.
Read next

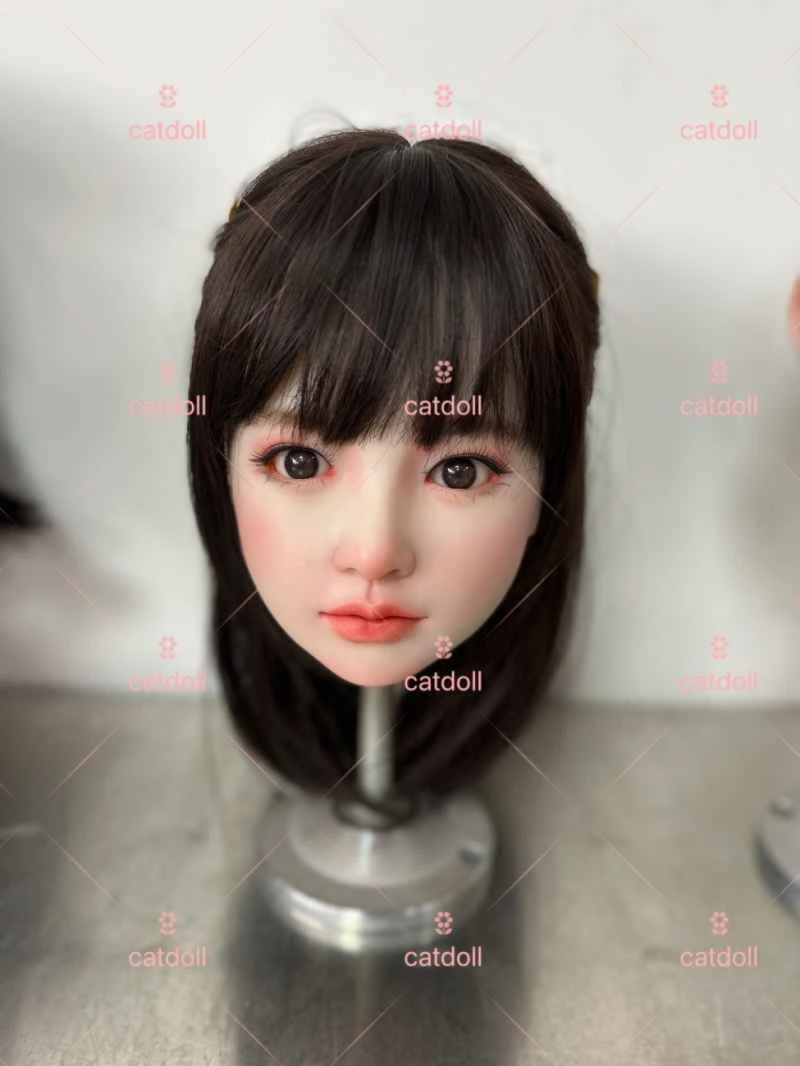
CATDOLL Kara Hard Silicone Head

The head made from hard silicone does not have a usable oral cavity. You can choose the skin tone, eye color, and wig, ...

Articles 2026-02-22
CATDOLL 123CM LuisaTPE

CATDOLL 123CM LuisaTPE

Articles
2026-02-22
CATDOLL Nonoka Soft Silicone Head

CATDOLL Nonoka Soft Silicone Head

Articles
2026-02-22